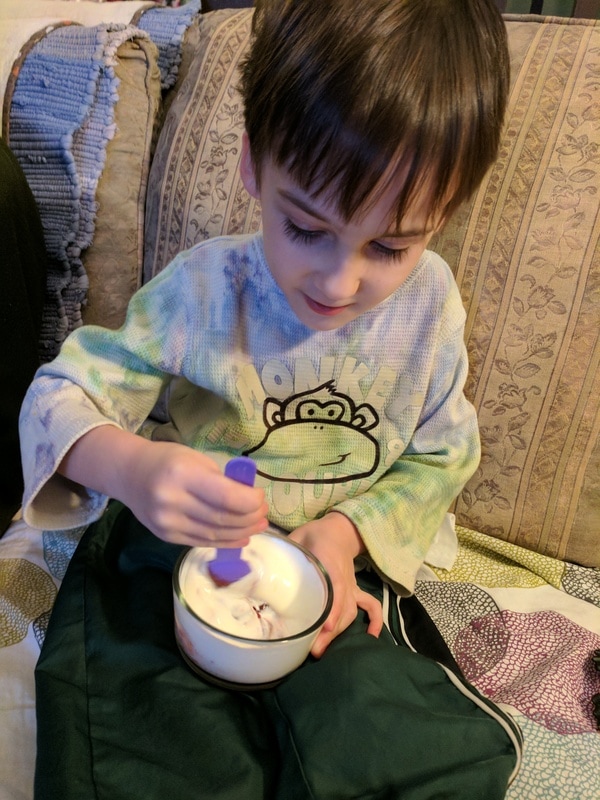
 Poor Caleb. Winter finally got him and he's chapped under his bottom lip. I tried every lip balm in the house, but they were all stinging and hurting him. Also, they weren't working. So I knew it was time to make my own! I know I make better lip balm than I can get at the grocery store... I used to sell it. I still had some of the key items needed, so with some recipe modifications to reflect what was in the house, I began! OH! I Should post the recipe! 1/2 block of bees wax (I don't remember how many ounces a block was... sorry!) 2 tsp coconut oil 2 tsp olive oil 1 tsp medical grade lanolin (the non medical grade stuff tastes gross) lip balm containers of some sort some way to double boil (I used a small mason jar in a pot of water) Let's go! 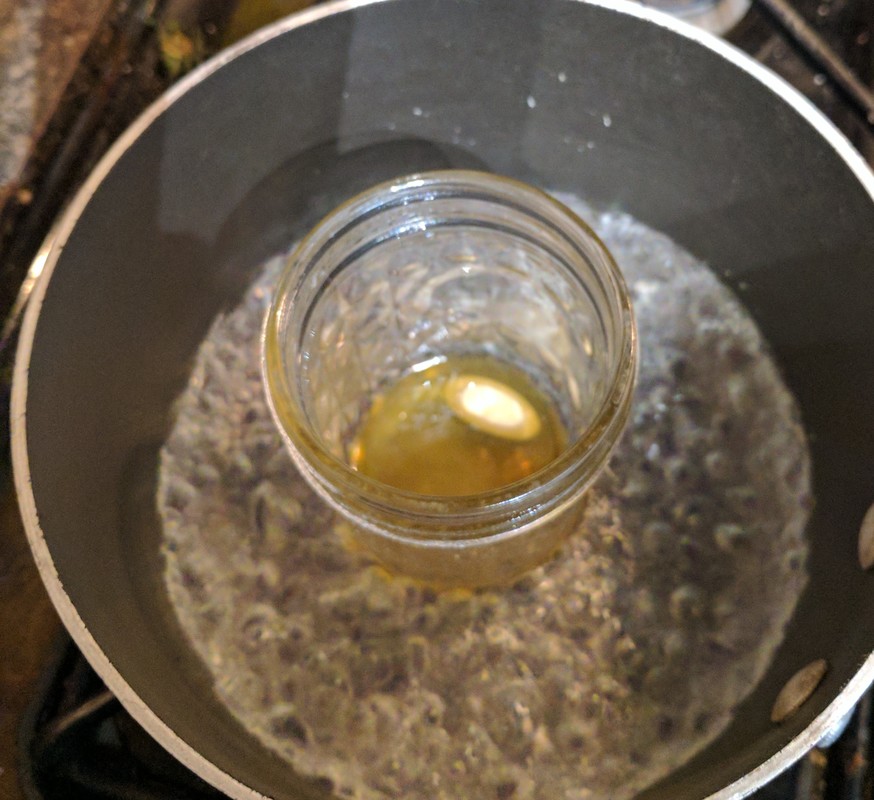 First put some water and jar or whatever into a pot and set to boil. Once boiling, put in your bees wax. It takes the longest to melt. 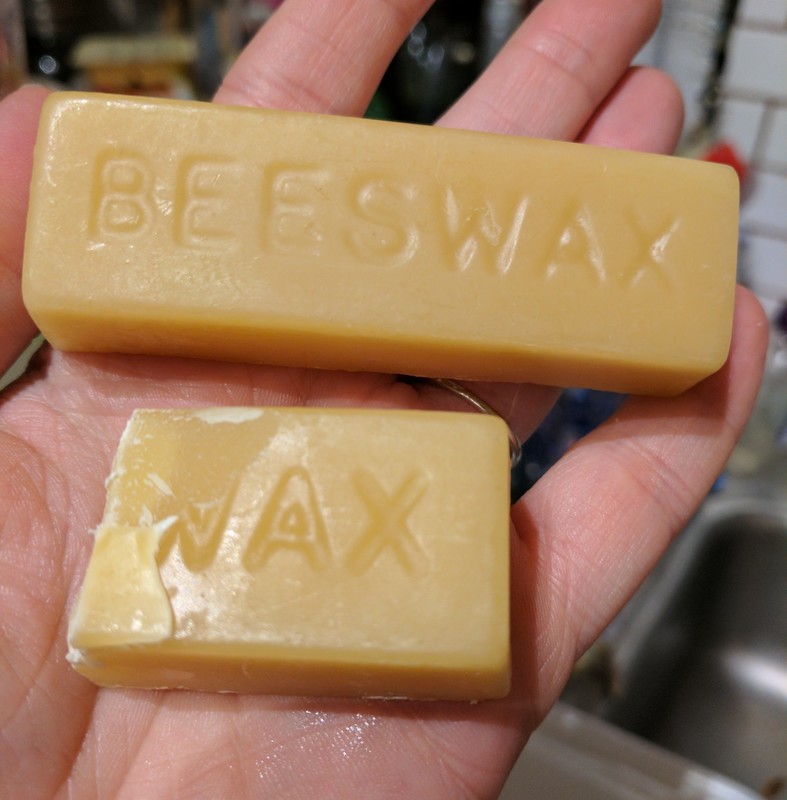 Look at that awesome bees wax! I am showing a whole one so you can see the full size. 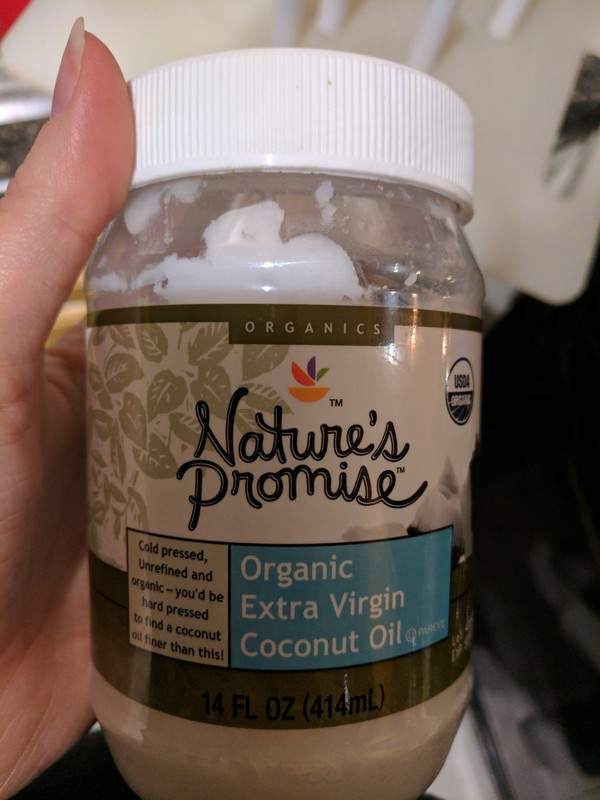 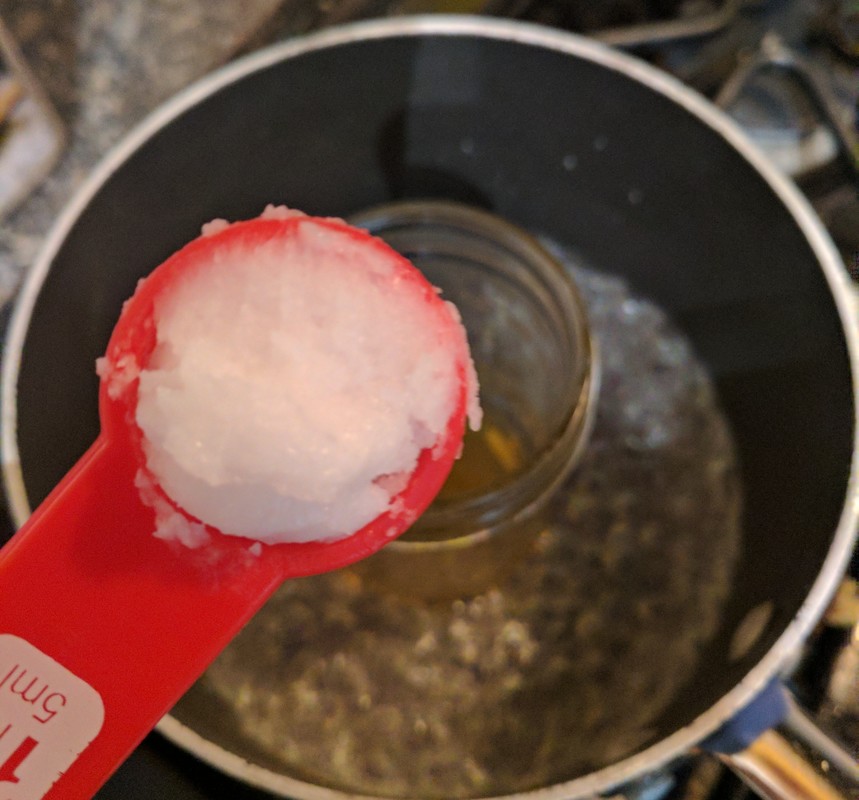 Once the beeswax is completely melted, add the coconut oil. Ahhhhh coconutty.... 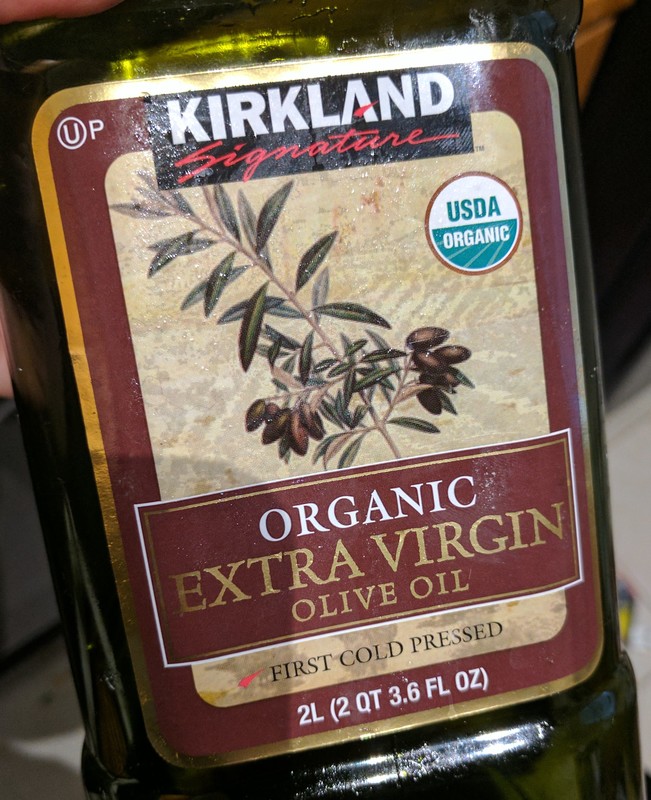 Then the olive oil next. 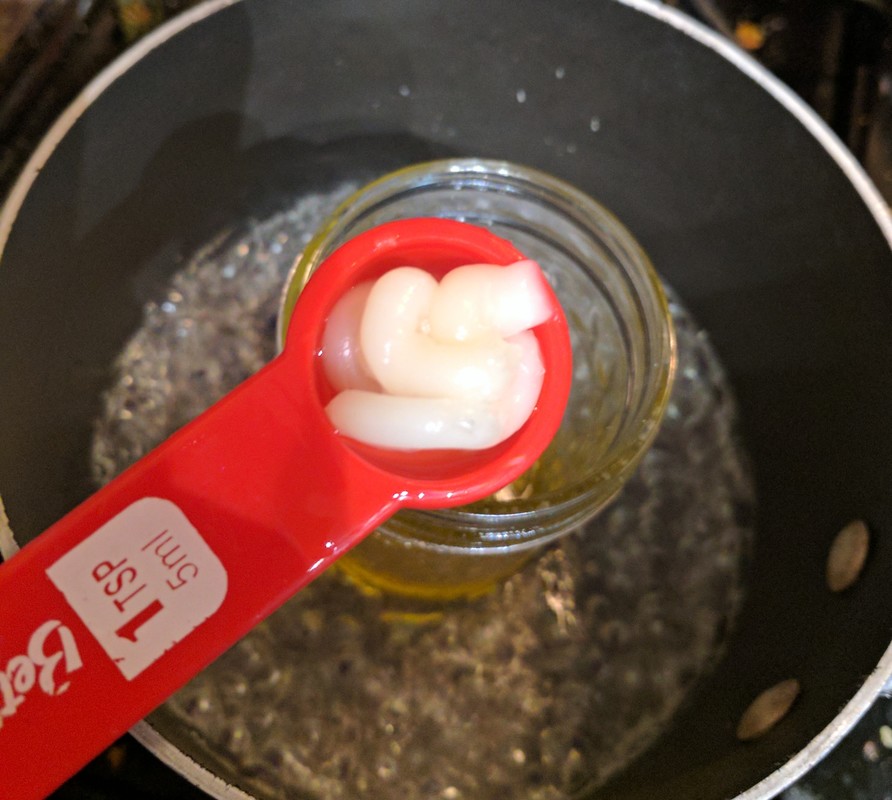 Then the lanolin. It should melt together pretty quickly.  It should look like this. Now its time to put it in containers! I have lip balm containers but you can use anything really. 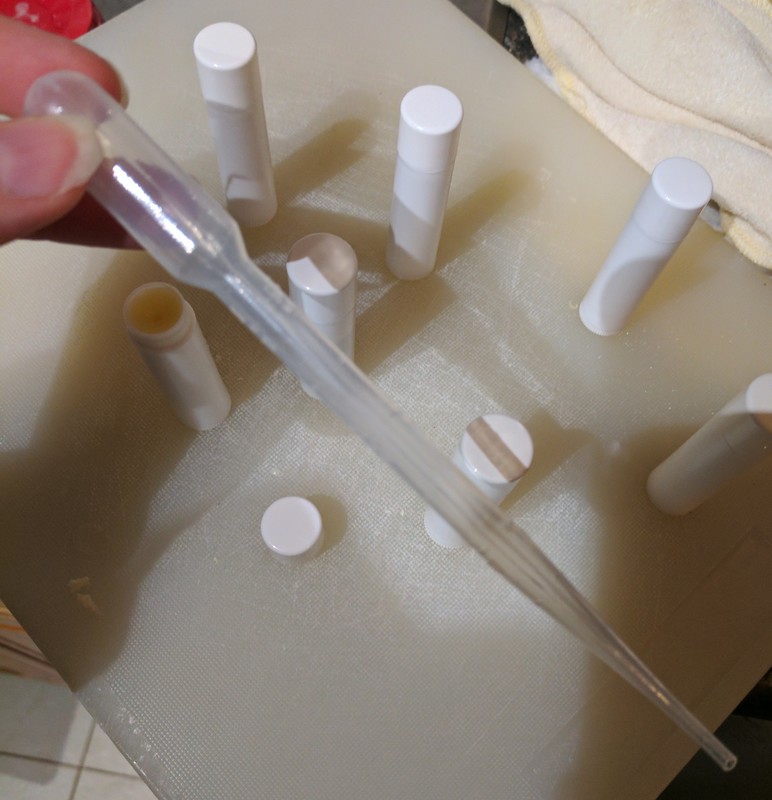 I also have these handy disposable pipettes to get the oil into the containers. 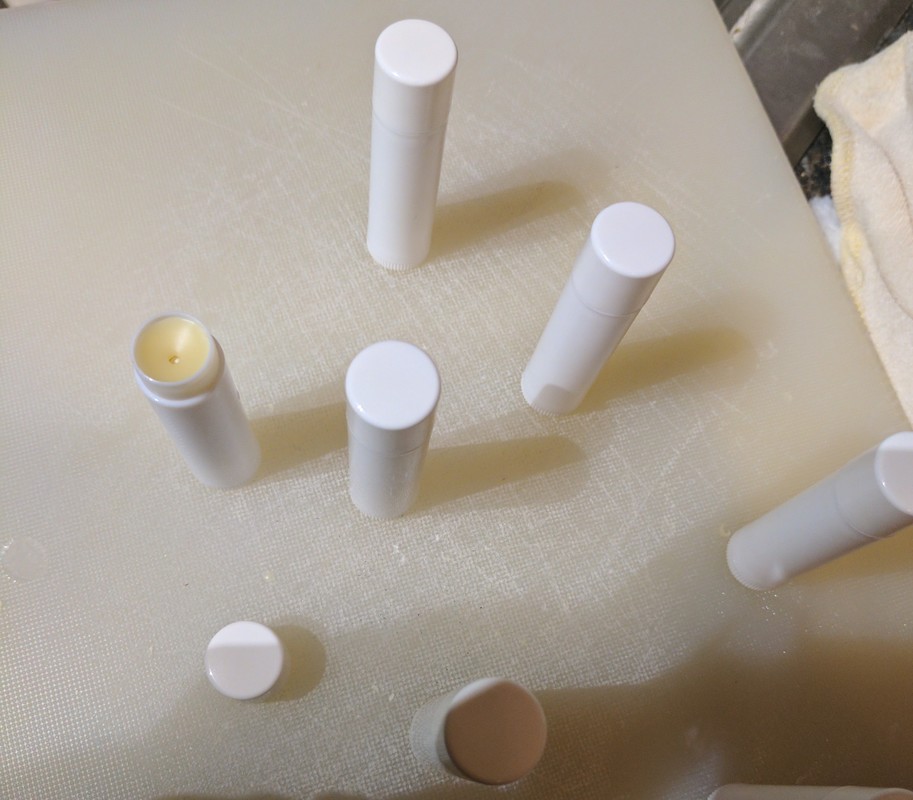 In the end I got 11 tubes worth. Not bad for 15 minutes of effort!
The nice thing is that you can experiment with the oils you like. My original recipe called for cocoa butter and grapeseed oil. Since I didnt have those, I used olive oil instead and omitted the cocoa butter. It's super flexible! You can even add in drops of flavoring oils like peppermint if you want. I went without this time but since the coconut oil was extra virgin, there is a slight coconut flavor. It's excellent. Have fun with it!!
0 Comments
 So, I like yogurt. The husband takes it with him every day to work for breakfast. Sometimes I even make him a refrigerator oatmeal parfait the night before for him to take to work. Hes been getting a case of Greek yogurt at Costco for a while now, but the problem is that Caleb always wants to eat it was well, and then he runs out. The other issue is that I would like the baby to have the full fat yogurt, but that stuff is super expensive. I know people who have made their own yogurt, so I figured I would give it a try! I was a little scared, the idea of leaving milk out overnight freaked me out a bit, but I powered through it. 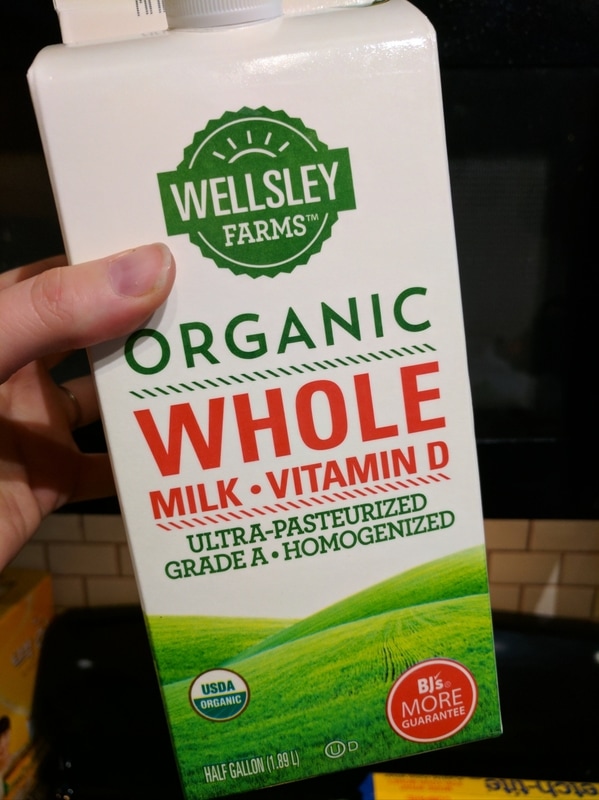 So we are going for Organic, full fat yogurt. I was a little concerned that the Ultra Pasteurized milk might not work right, but it's what I had on hand. 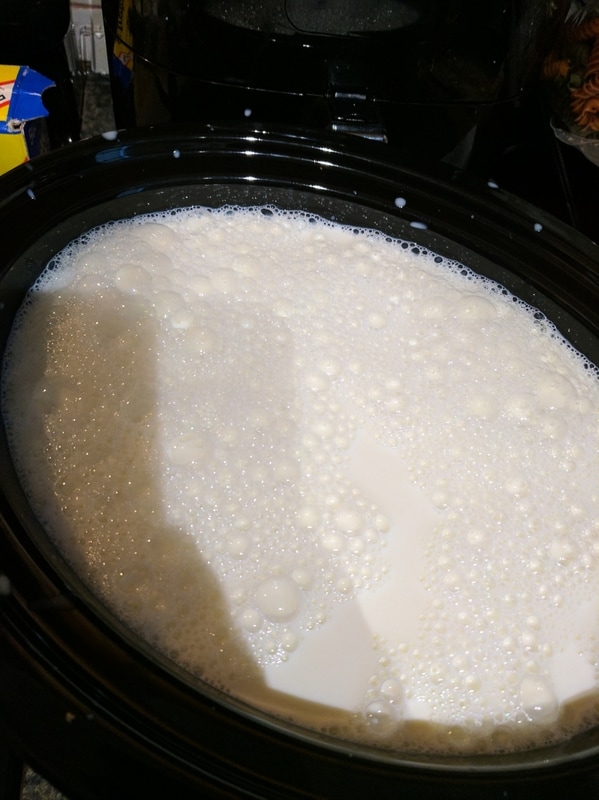 First I dumped a gallon of milk into my crock pot. You can also do this on the stove, but it requires more attention than I am willing to give. I can't be bothered with all that stirring and making sure the milk doesn't scorch. Up until this point, I also didn't realize that my crock pot holds a gallon of liquid. Good to know. 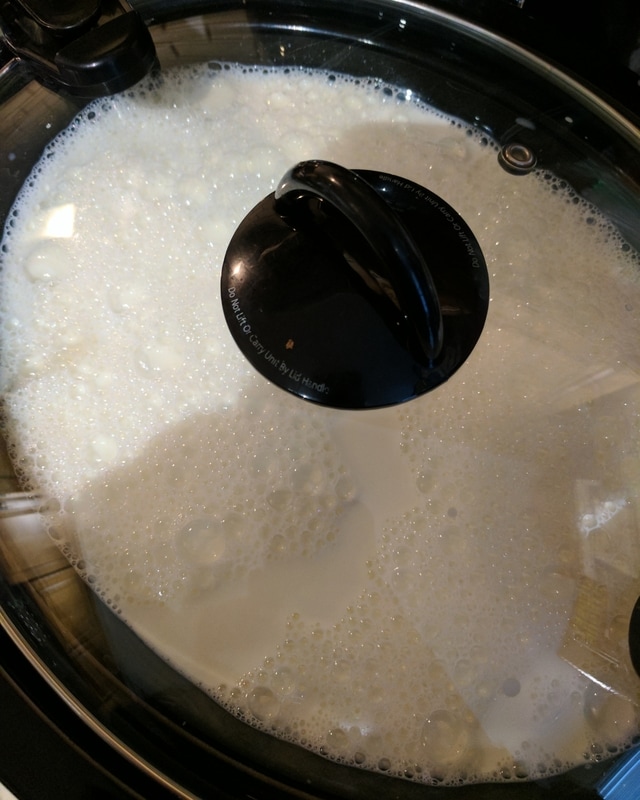 I then ignored it for 2 - 3 hours. Cleaned the house and got ready for the company coming over. Once it hit 180 degrees, I shut off the crock pot. I then ignored it for another few hours while I waited for it to get back down to 110 degrees. Our friends came over and we has an awesome time drinking beer, eating mac n cheese and playing with all the kids. 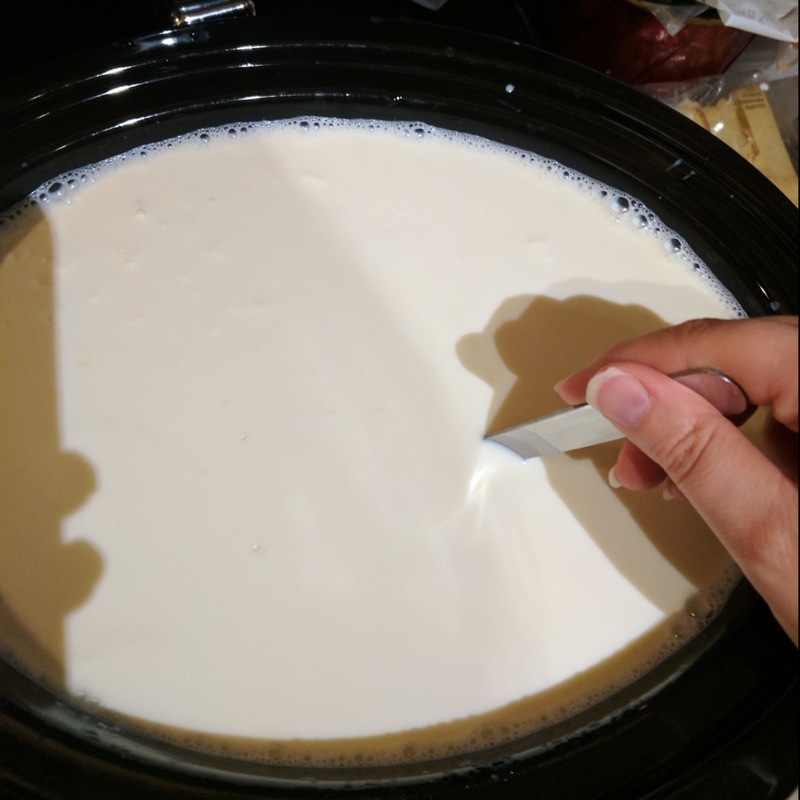 Woo Hoo 110 degrees! I grabbed the single serving of plain yogurt that had been sitting out to get up to room temperature, and gently mixed it in. After I got it mixed in I realized I was supposed to mix the yogurt with a bit of the warm milk and then add to the whole pot. Oops. Hopefully that doesn't screw anything up. 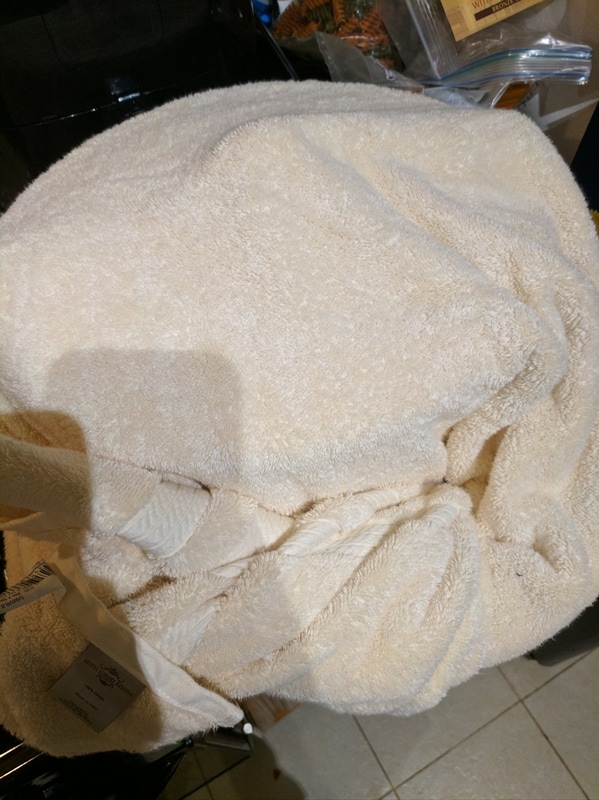 Now, the milk gets to have a nice cuddly snuggle with a bath towel. I wrap up the crock pot and leave it for the night. Goodnight milk, don't do gross things overnight... 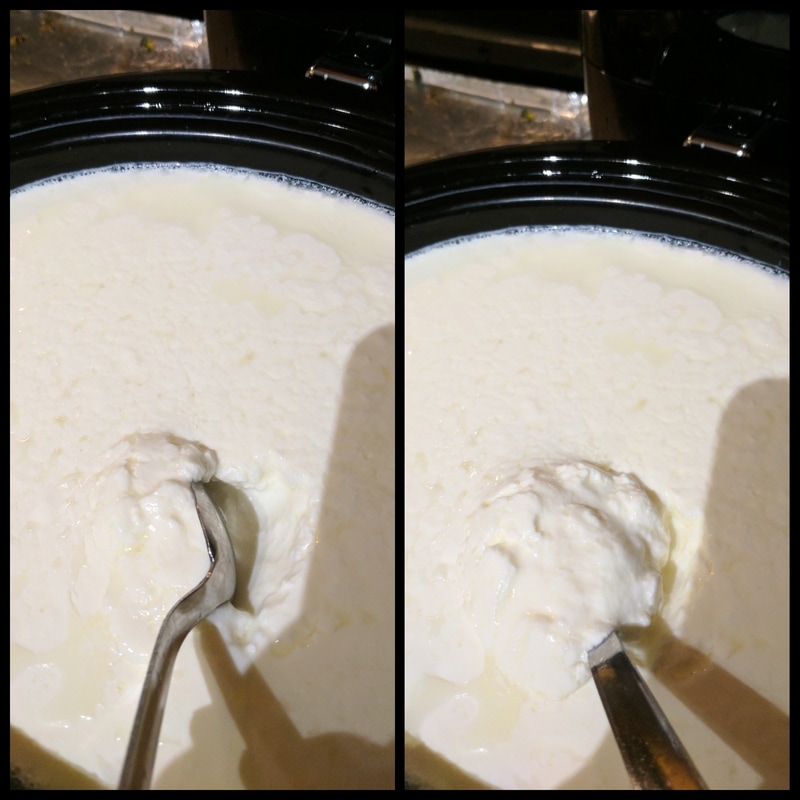 Good morning! Its been 12 hours since I left the milk. I'm super excited to see what happened! You guys...... It's yogurt!!!!!! I'm so excited!!!! Its thick and creamy and smells like yogurt. Omg! I'm feeling more confidant now. 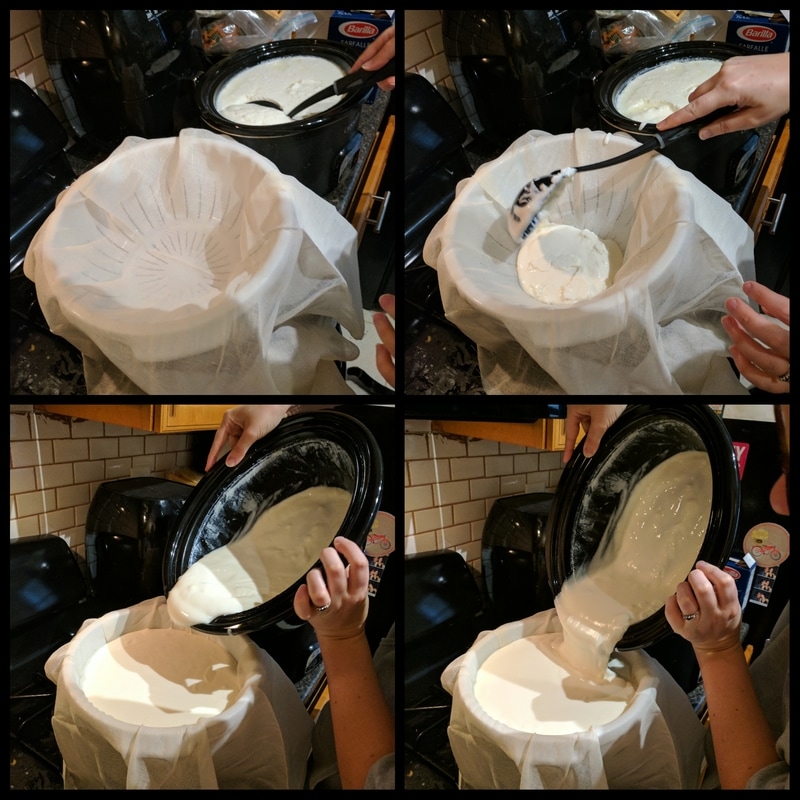 Time to strain it. I plopped a colander on a big bowl and lined it with cheese cloth. The idea is to strain out some of the whey for a thicker yogurt. It looks so amazing!! 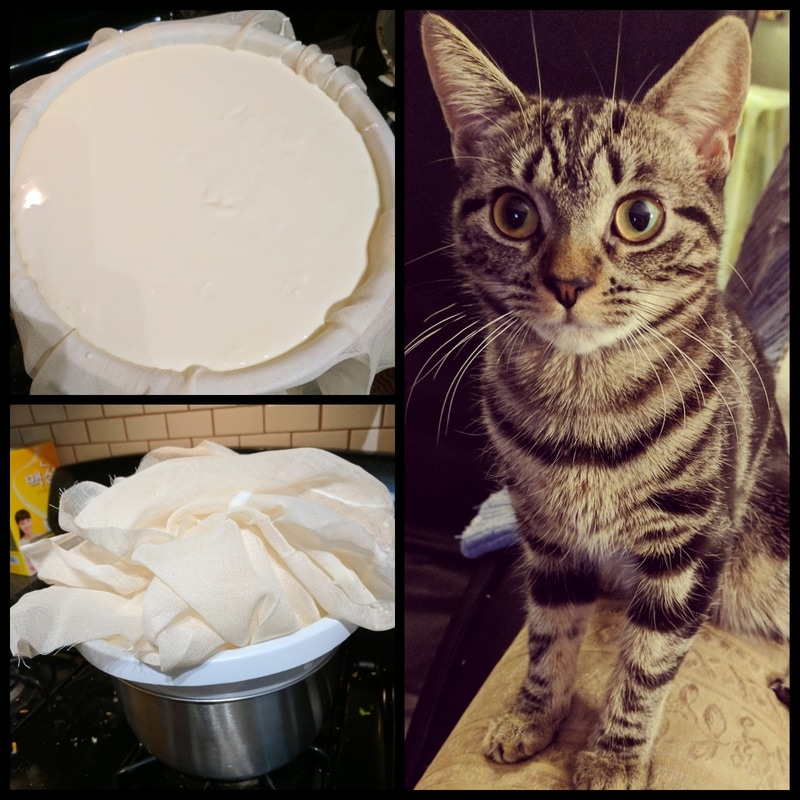 It all just fit, which is great because we need to get to church. I decided to cover it because we have a very curious kitten around who would love to stick her nose in some fresh yogurt. Naughty cat. Off to church! 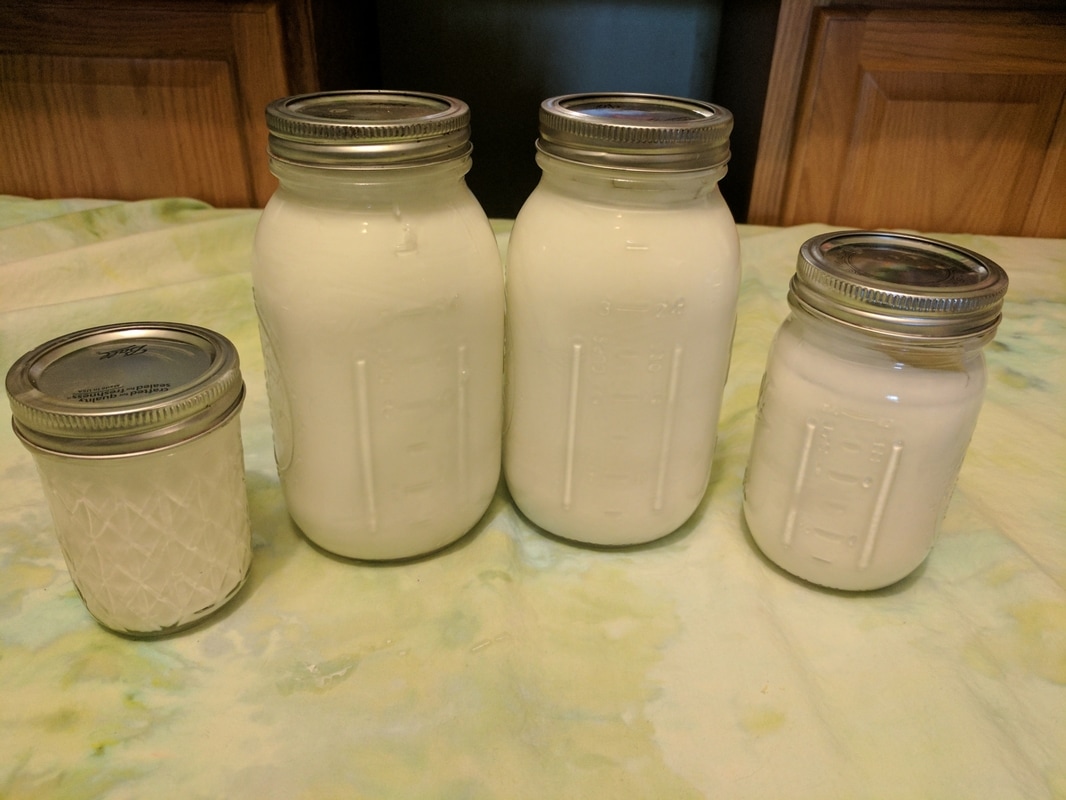 When we came home 4 hours later it was done straining. I tasted it and it was so yummy! I ended up with approx 11 cups of yogurt. Its not super thick, but its very creamy. If I had let it strain longer it would have gotten thicker. Next time I might let it strain a little longer. The little jar will be the starter for the next batch. I also have a bunch of whey, and I cant wait to figure out what to do with that! if you have ideas, leave me a comment. 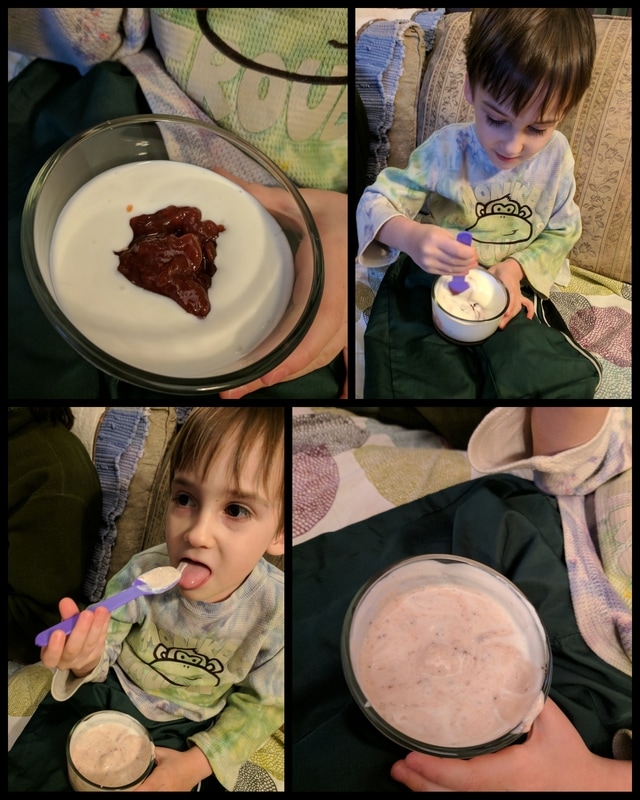 Caleb got to be the taste tester! I figured the 4 year old would give honest feedback. i added some strawberry preserves and gave it to him. He absolutely loved it!
Here is the recipe I used: Ingredients
Instructions
Notes ***You don't have to use the slow cooker method. For a quicker method simply heat the milk in a large stock pot over low to medium heat. Just be sure to stir it regularly, especially as it gets hotter, to prevent the milk from scorching. Then follow the rest of the instructions as written. 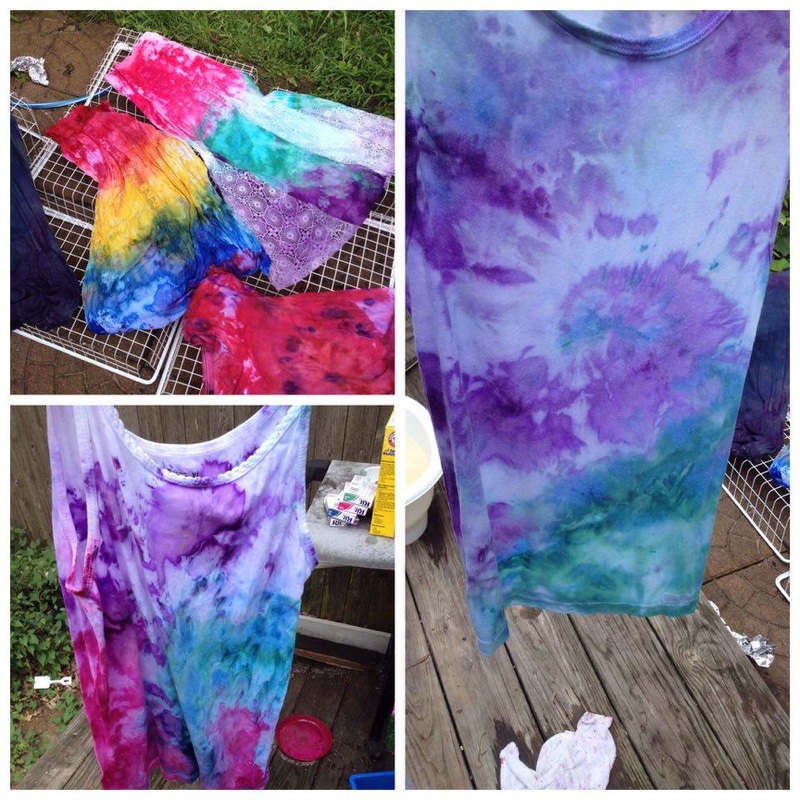 One day I was messing around on Facebook and I saw a post in one of my baby wearing communities. A mom had taken her baby carrier and ice dyed it. Now, I was raised by hippies, I know all about tie dying and have a great appreciation for it. But I had never heard of ice dying in my life! I was intrigued! I loved how the carrier turned out, so I decided to search the internet to learn about this mythical, and wonderful, art form. So I got lost in the internet for a few days because that's what I do. I research the crap out of something, figure it out, then do it. So that's what I did! My niece came to visit a few weeks later and we were looking for something fun to do. I decided it was time! We were going to be visiting my dad in a few weeks in Washington State for his Motorcycle Rally (www.rainforestrun.com), so I figured having some new clothes would be fun! Excited, we set off for the thrift store. We poured over the store and got 2 white shirts each to dye. We bought the dye and then a big sleeve of ice and we were ready to go! To do this, you need the following: *Stuff to dye (preferably white, but light grey, off white, and light tan can work too) *soda ash *powdered dye. NOT LIQUID (I used Rit. I hear others brands work great as well) *a lot of ice (we used a large Costco sized bag for 10 - 12 items) *Aluminum foil *Grates, or something to put the clothing on so the ice melts through and the clothes are not in a puddle. Be creative. I used wire shelves. *Vinegar *Water With trepidation and excitement we started! 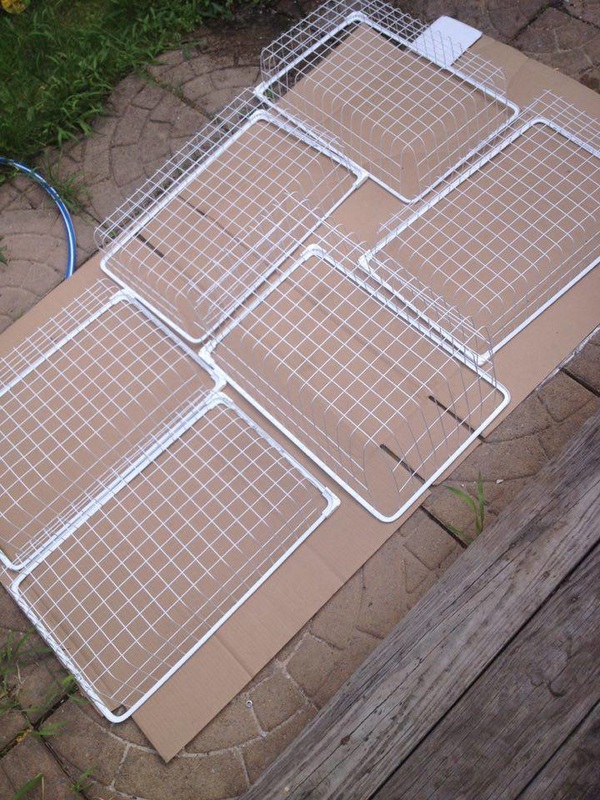 One of our friends had given us these Ikea baskets the other day, and they were unexpectedly perfect for what we needed! We laid them out and got ready! 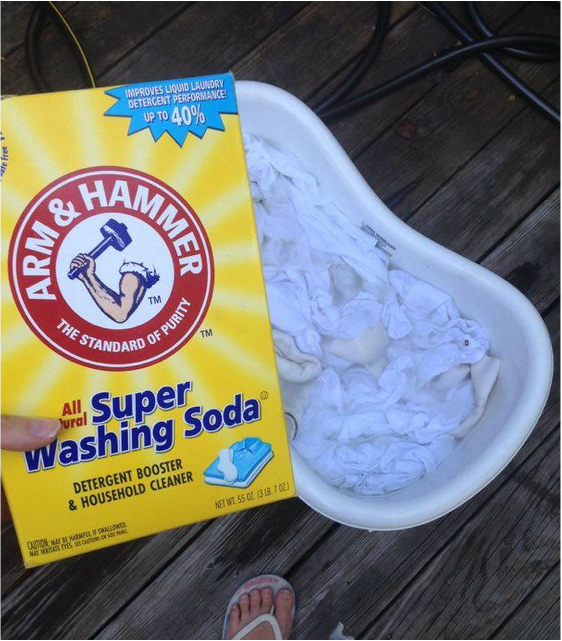 First we soaked the clothes in soda ash to help the colors soak into the fabric better and make them more vibrant. Our infant bathtub we were no longer using was perfect for the task! 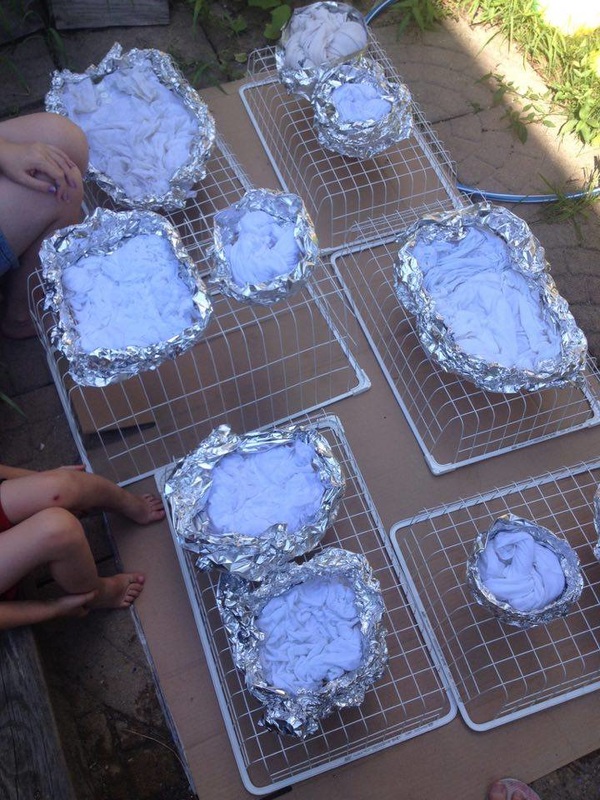 We pulled out each item and wrung out the excess water. Then we placed each item separately on the wire drawers. We then then scrunched them up, and added a twist here and there for fun. Having it not lay flat makes even cooler designs. Do NOT roll it up tight or put rubber bands on it like you would for tie dye. You want it loose. After we got everything like we wanted it, we made aluminum foil walls. The walls keep the ice on the clothes while it melts. So we bunched up lengths of foil and wrapped it around the clothes. By now we were actually melting because it was like 95 degrees out. But we persevered! It was time for the ice! We gleefully covered each item with a pile of ice, cooling ourselves in the process. Ideally you don't want any fabric without ice on it. So pile it on! 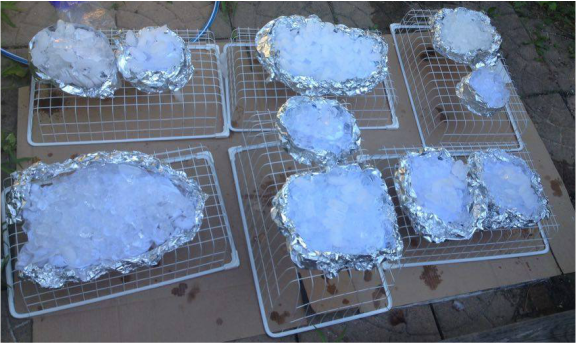 Finally it was time for the fun part! We got disposable spoons and used them to sprinkle the dye on the ice. We had no clue what we were doing so we tried a bunch of different ways to do it figuring something had to turn out well right? And now, we wait for the ice to melt. We scurried inside to cool off at this point. 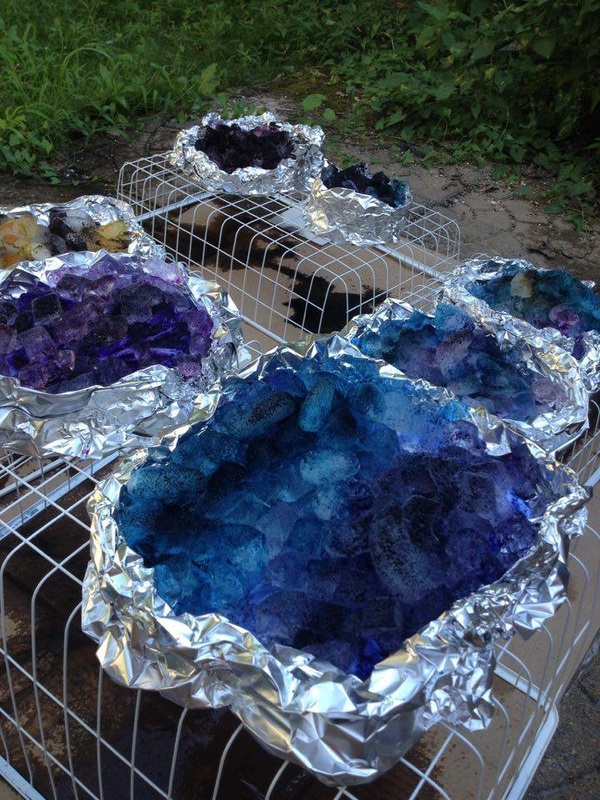 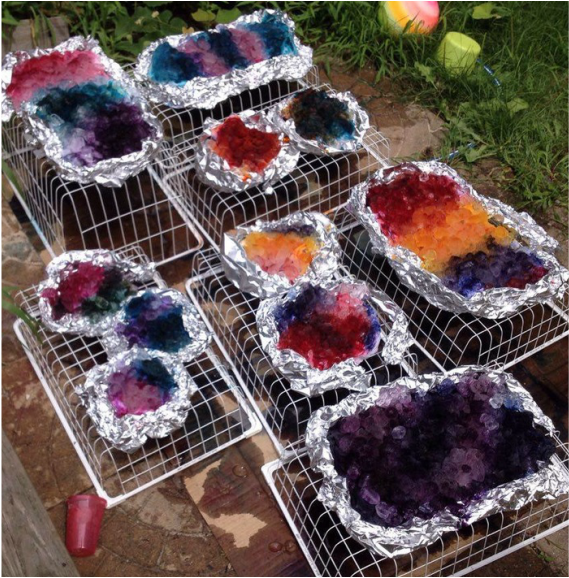 It was so hot, it only took a few hours for the ice to all melt. I removed the foil walls and rinsed the garments off in the position they were in one by one. After the water ran clear, I opened them up and rinsed some more. I laid them out to dry, quite satisfied with how things were going! 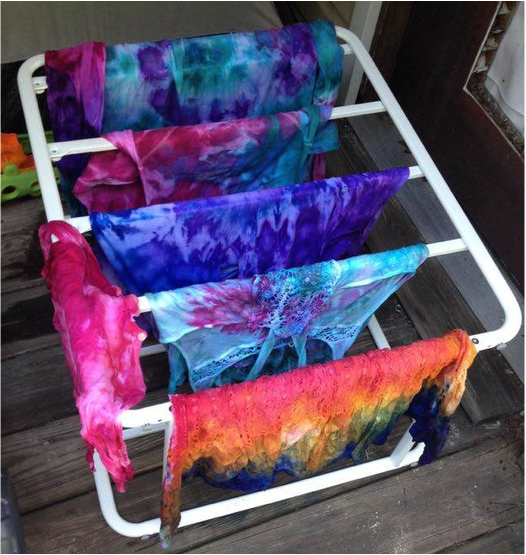 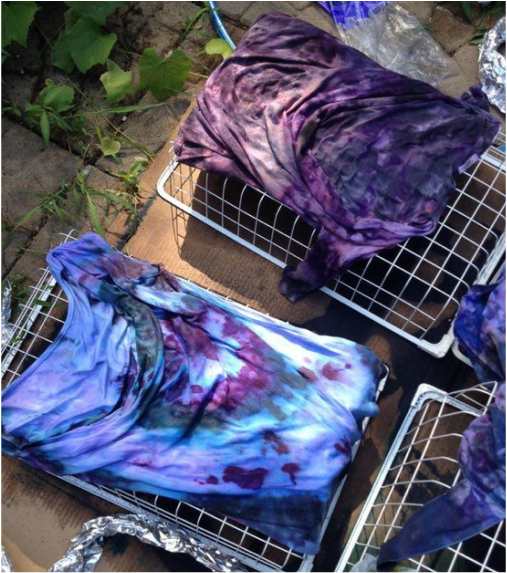  I let them dry overnight, and the next morning I soaked them in vinegar and water for approx 30 min. to set the colors. I kept like colors together just in case some things bled, which meant that some items ended up in bowls by themselves. After the vinegar soak I put the items (again keeping like colors together) in the washing machine for a cold, gentle wash. Then they air dried. 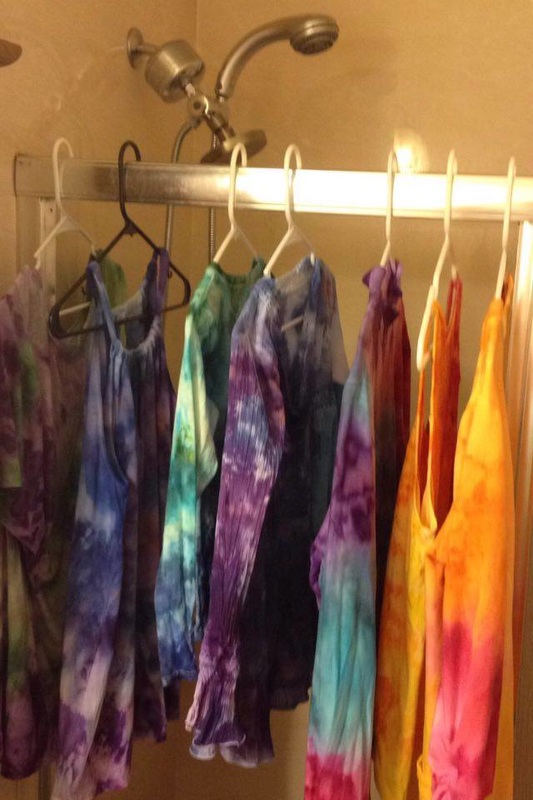 I'm really thrilled with how everything turned out! As a matter of fact I have ice dyed a bunch of different things since then. I'm even selling stuff now! 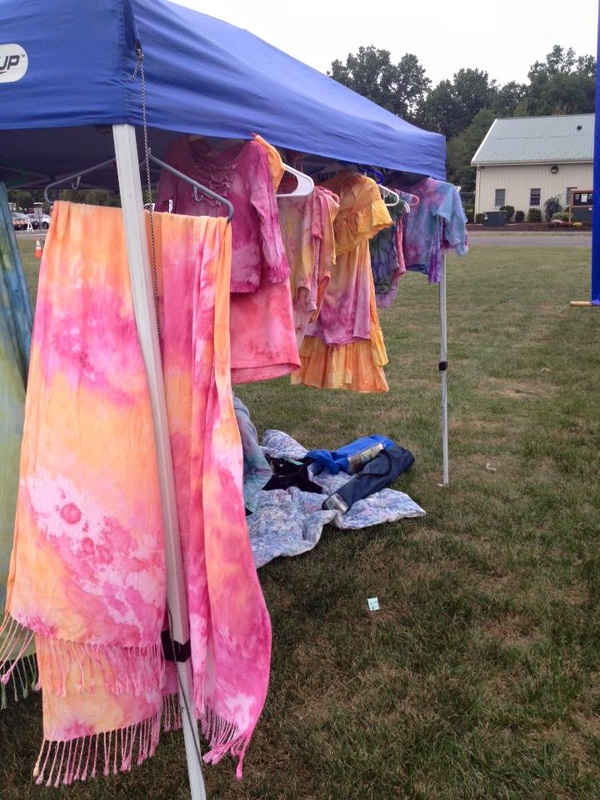 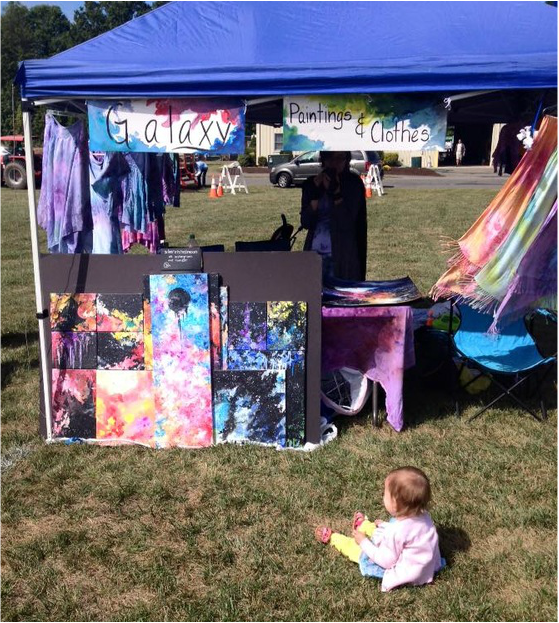 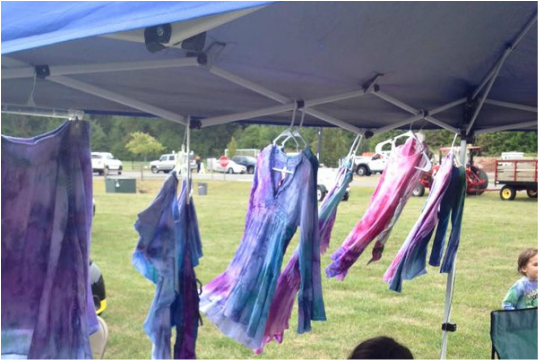 I hope this has inspired you to do it yourself! I also have stock on hand and can take custom scarf orders if you like. Just tell me what colors you like :) Here are some action pictures of stuff we dyed :)      I love to sew! Unfortunately with running my own business and chasing kids I don't find any time to sew really. When Trinity was a toddler I realized pretty quickly that she would be tall and skinny like me and her dad. When I was a kid I never had pants or dresses or skirts that fit because of my size. So as Trinity got leaner and leaner I decided to learn to sew so I could make things for my sweet daughter. Fast forward to today. Trinity is going to a camp that requires a one piece bathing suit. This is problematic as they just don't fit her. Tankinis still expose her tummy due to her height, so that wasn't an option. So I decided to alter a bikini and turn it into a swim dress! I had never done it before, or even sewn with bathing suit material...but I decided I was doing it anyways! We got the same bikini she already had because we already knew it fit her great. This is what we started with:  Super cute right?? I began by having Trinity put the bathing suit on backwards and pinning the extra fabric onto the suit. I ended up having to do this twice because I didn't realize how stretchy that fabric really is. I only poked Trinity with a pin a few times. 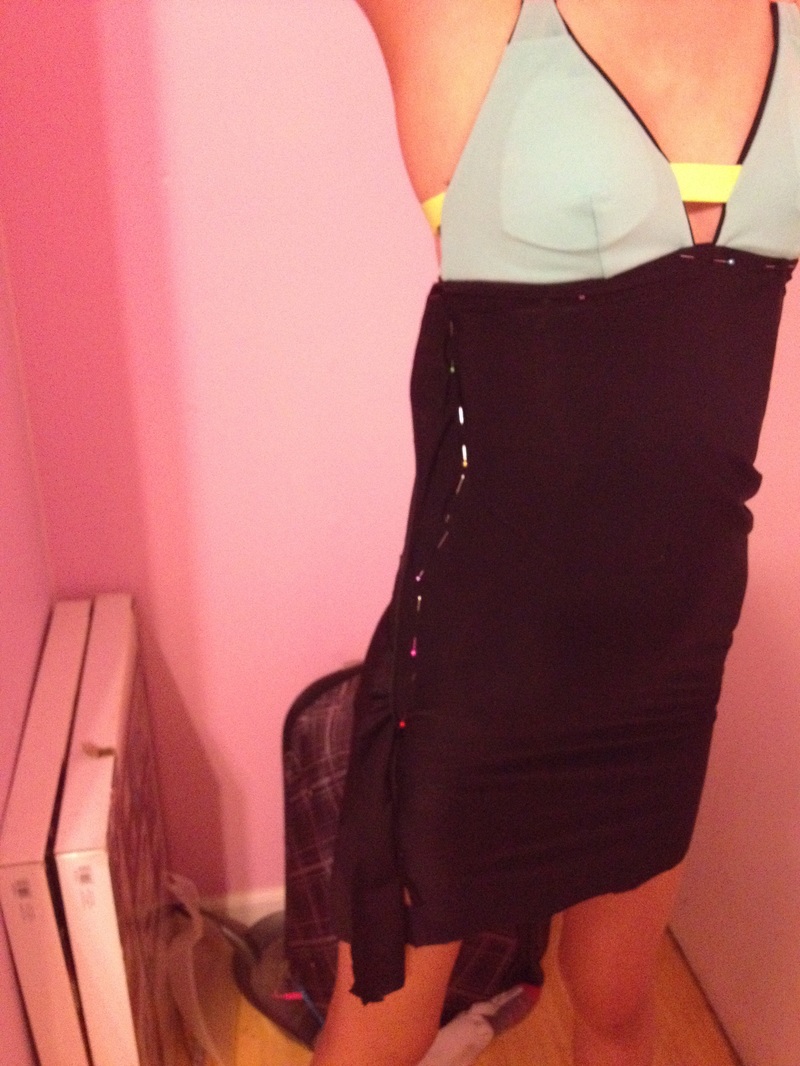  Once I got that that all pinned and Trinity was terrified with the amount of pins close to her, I added a bit of fabric to make the top less revealing:  Trinity very gingerly wiggled out of it and I began to sew! 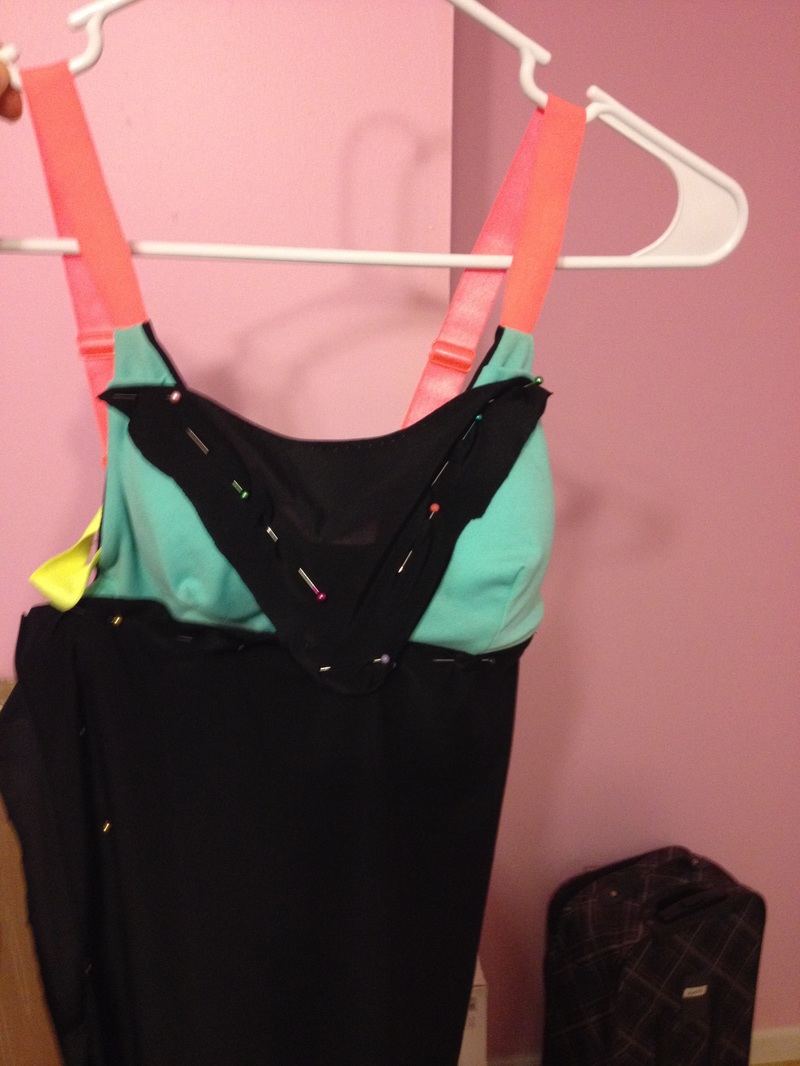 I was having some major problems sewing at first. I had to go through 3 different kinds of thread before I found one that wouldn't drop stitches like crazy and do odd stuff. The color wasn't what I wanted for the thread, but at that point I was over it and just wanted this thing sewn up.  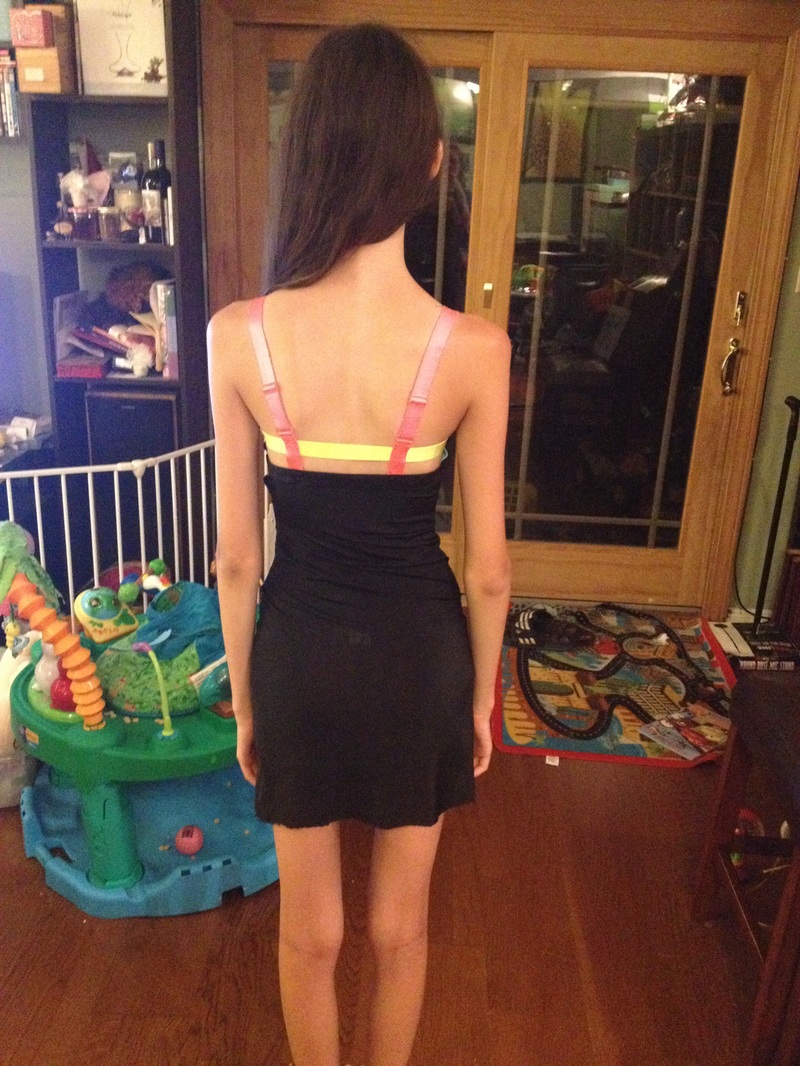 Whew! So far I am very pleased. Yes, I have dropped, jagged stitches but it's still looking cool! No onto making more moving room on the skirt part. 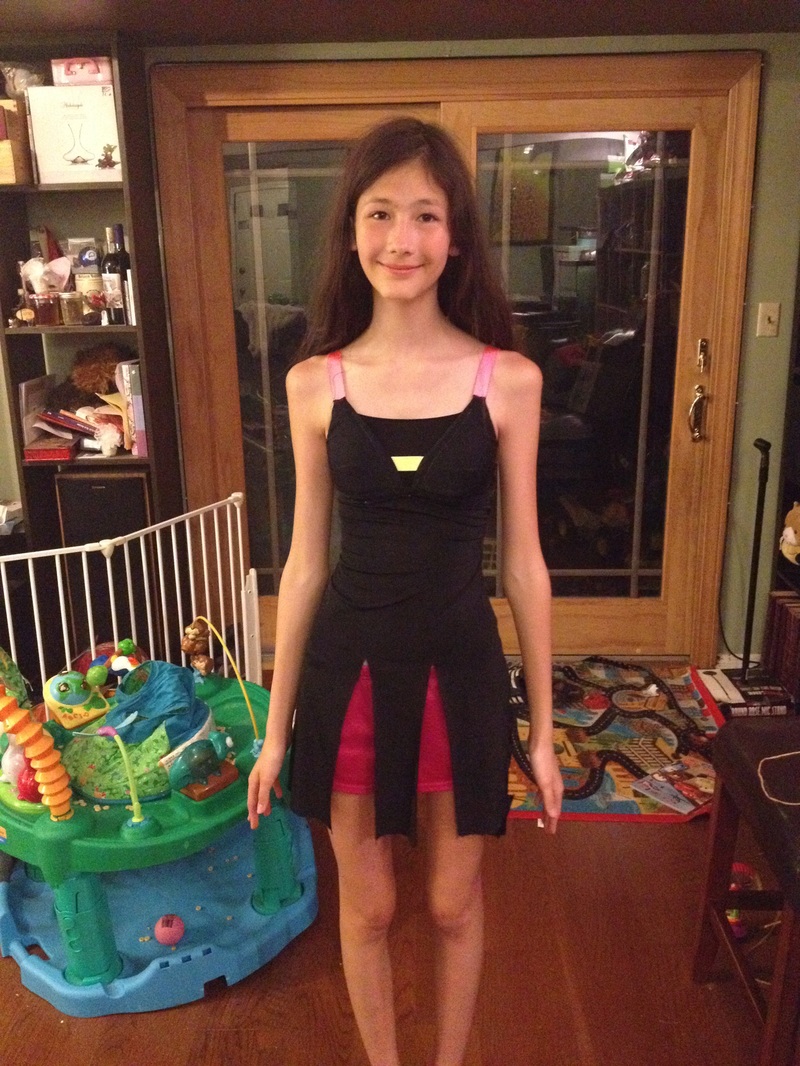 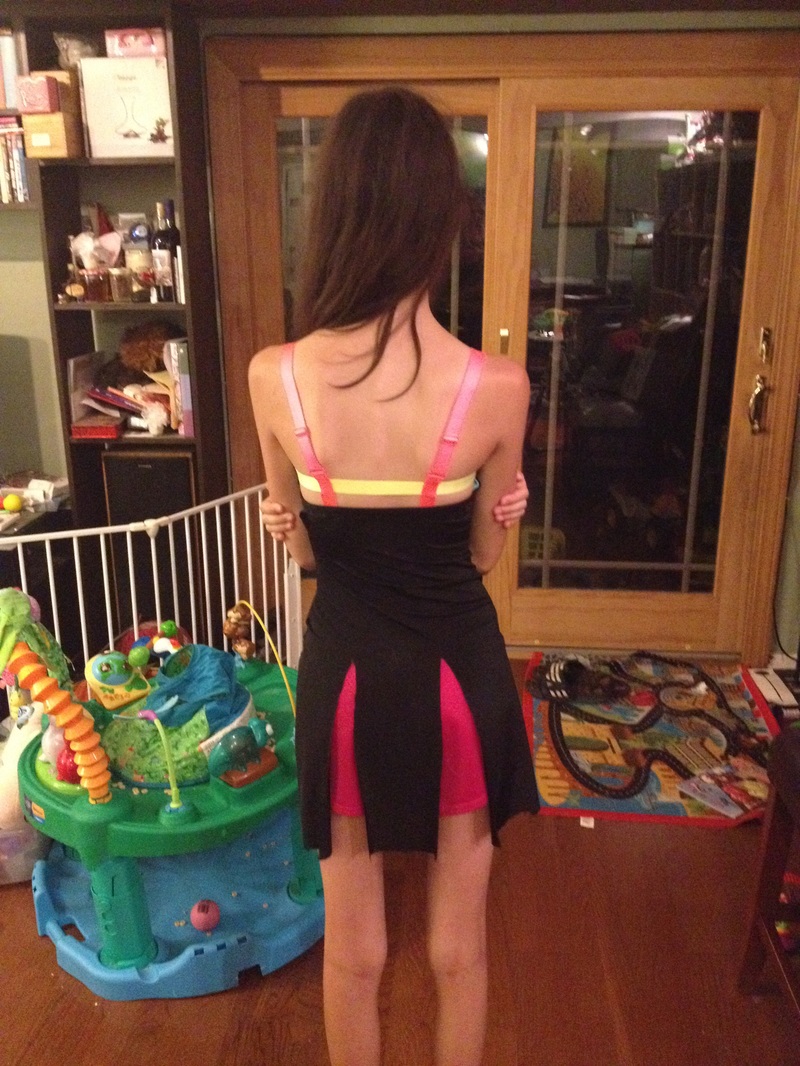 I cut the skirt to insert panels!  The top of the panels got a bit wonkey, but I can fix that. 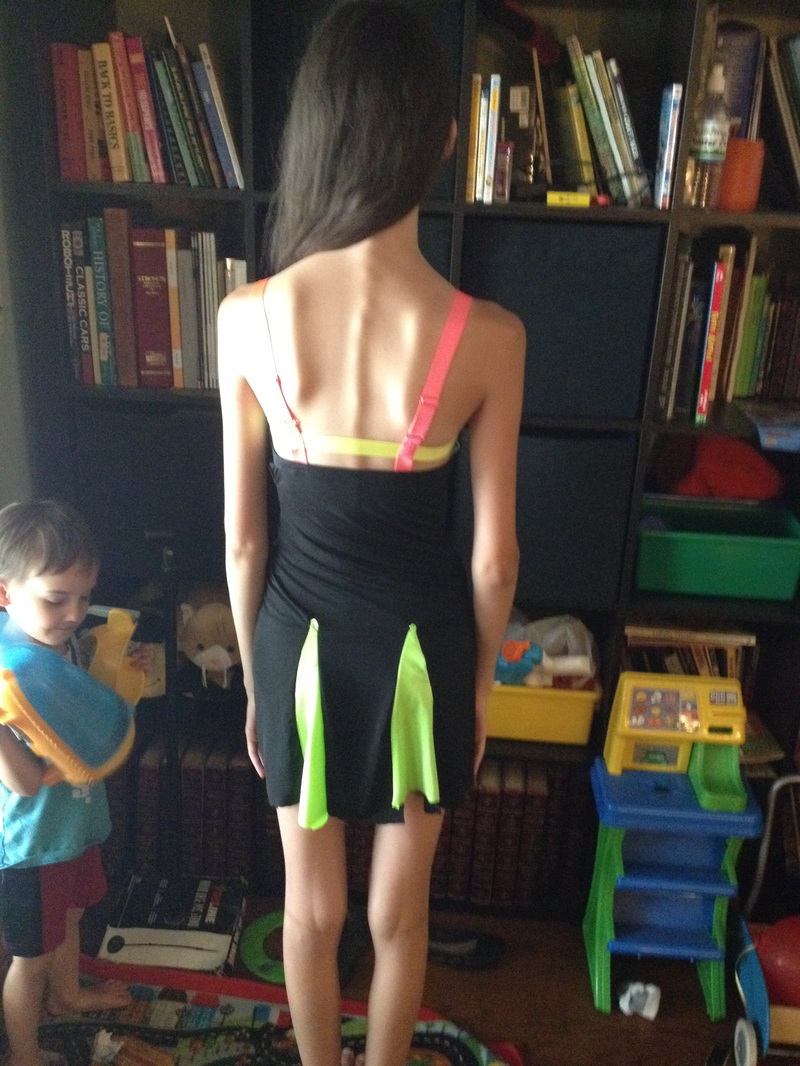 Somehow the back panels look better. Caleb also decided to photobomb haha. Now I just have to shorten and hem! 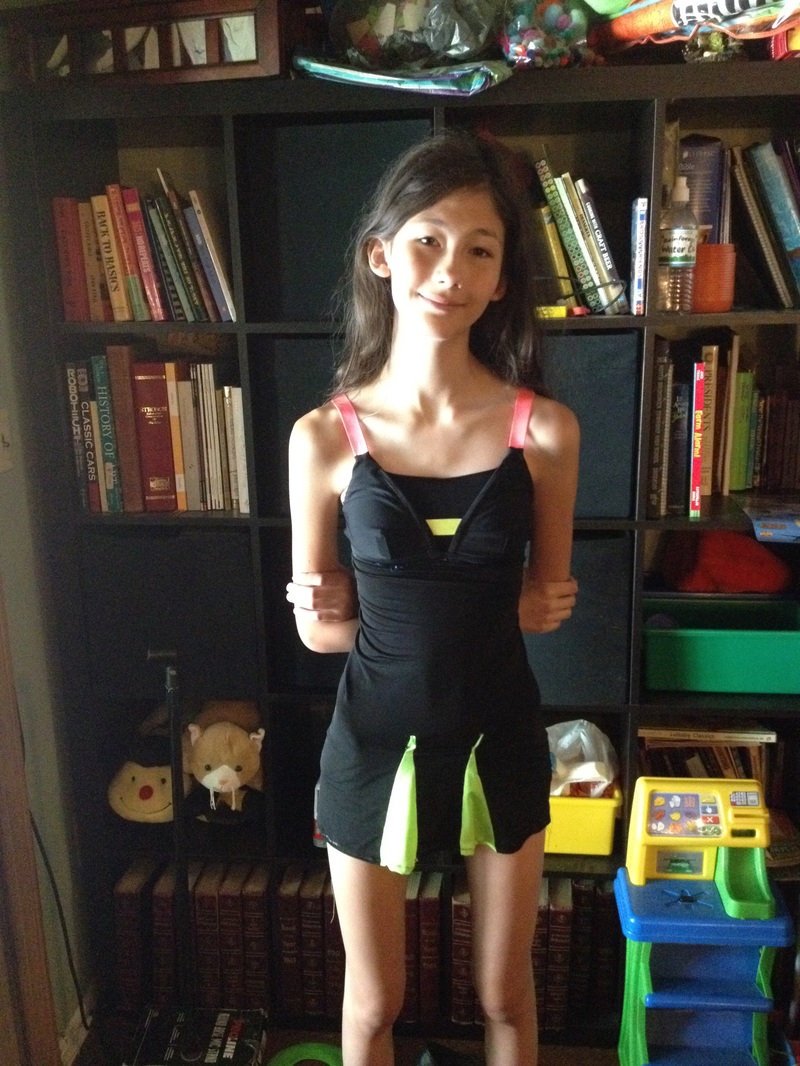  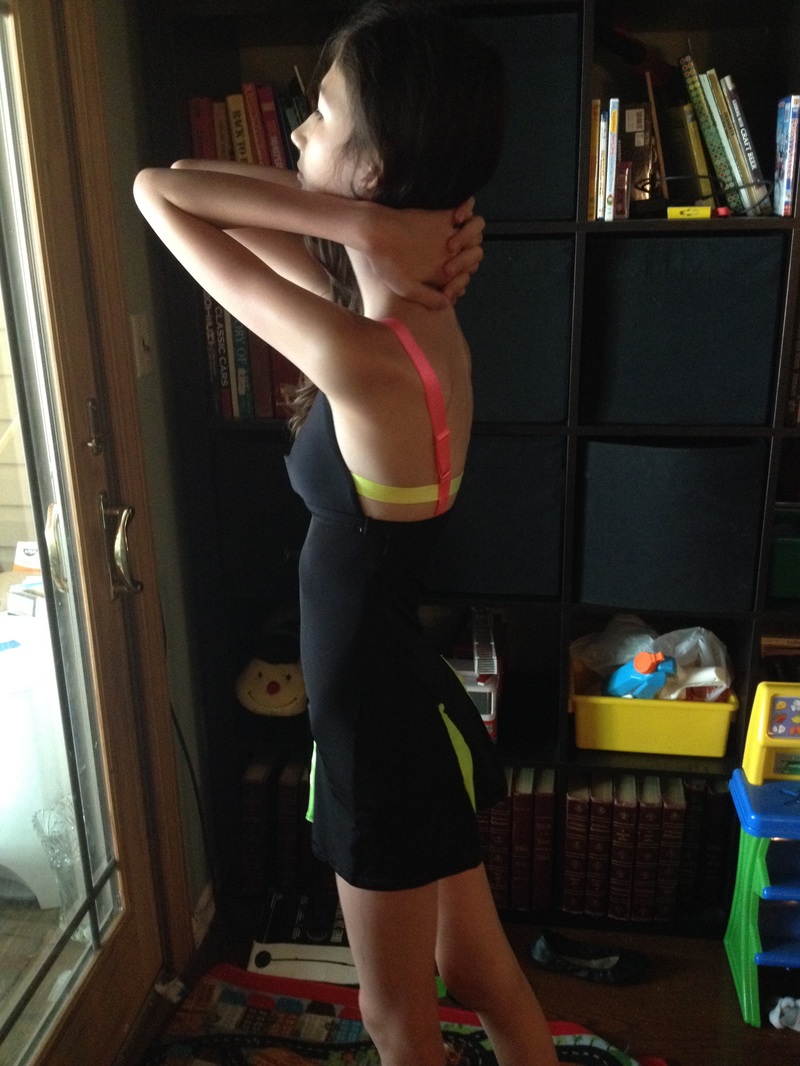  DONE!
It took about....2 hours from start to finish. Its not perfect but I am super proud of myself! Trinity loves it and wore it to a pool party already. It held up fine and worked great. I love trying new things! 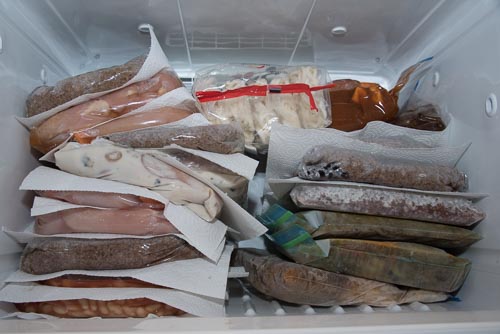 Hello everyone and Happy New Year! I spent the last day of 2015 busting my butt in the kitchen doing another 20 dinner prep. If you didn't see my last one, check this out for reference http://www.sonottired.com/blog/how-to-prep-20-dinners-at-once. I was using a different meal plan this time although it is still from http://www.5dollardinner.com so prep was a little different. This is also a slow cooker plan because after running out of my previous stash of dinners, I'm tired of thinking about dinner. 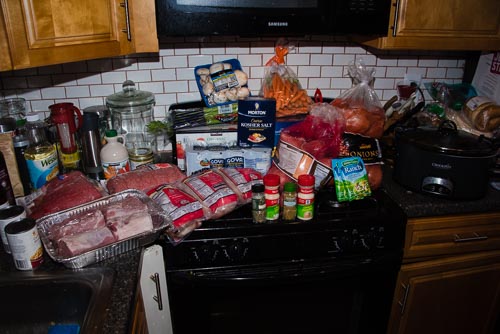 First you get an obligatory ingredients shot. I shopped the day before. I find shopping and prepping the same day to be too much for me... I've got tiny people! Thankfully DJ and Trinity are home so I have help this time. 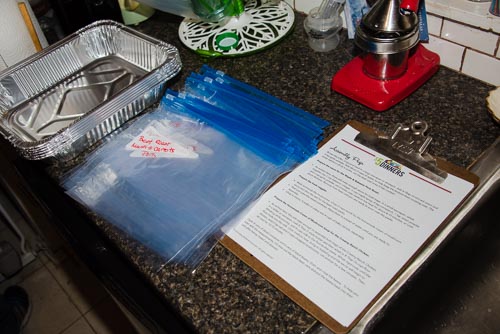 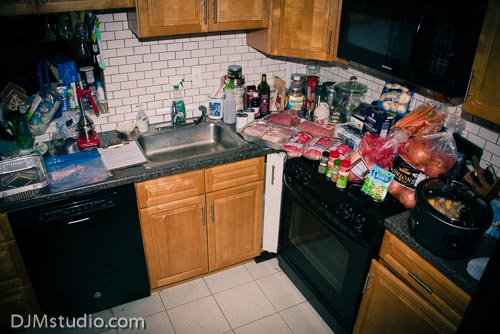 After gathering everything I label all the bags and set out my pans for the chopped veggies. I also use these pans when I put the bags together. The meal plan is awesome, it give you the shopping list, recipes and prep instructions. Its nearly impossible to mess up if you follow the directions. Also, I do not have a huge kitchen by any means. You can do this is any sized kitchen. Hint: before you begin, clean your kitchen, empty the dishwasher, have an empty garbage bag in the can and a recycling bag ready to go. Once you get going you don't want to have to deal with these things.  I strap the tiniest helper onto my back and begin! 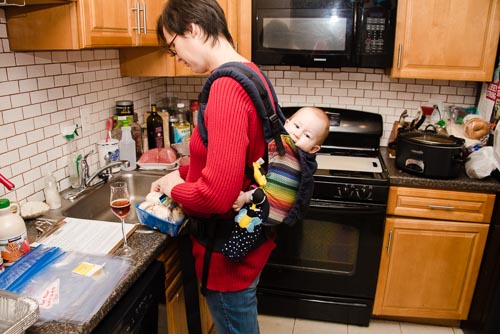 First I wash and chop the veggies. This plan has less veggie chopping than my last one so I am hoping it will take less time overall. As I chop things I put them in pans and bowls. 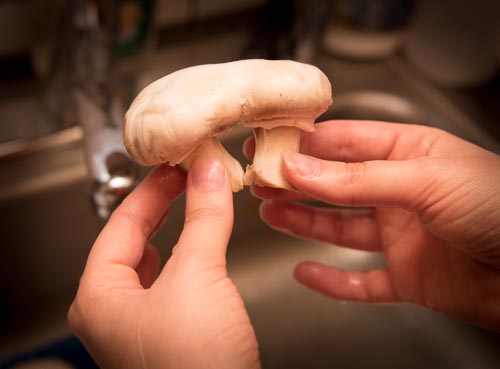 Freakiest looking mushroom. 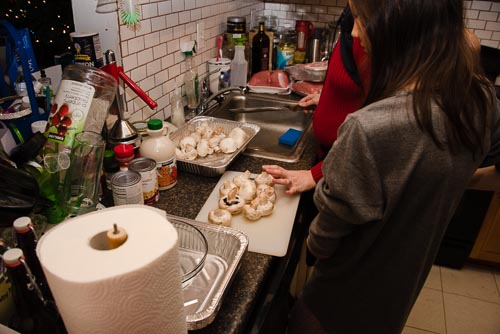 I realize that 1) I have to cook two sauces and 2) I need to peel 10 lbs of sweet potatoes. So I call for backup in the form of child labor. 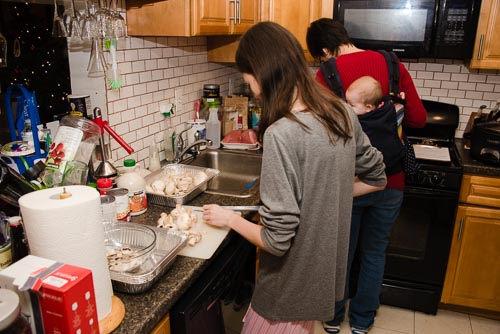 Trinity gets to work while I prepare the maple sauce and creamy mushroom sauce for two of the dinners. They have to be cooked and cooled before putting the bags together so I need to get them done first.  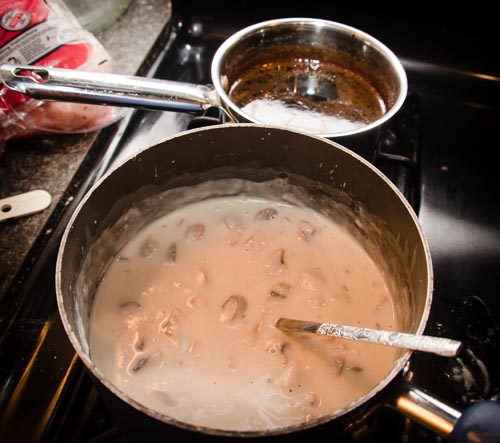 Seriously you guys, this mushroom sauce was a homeade cream of mushroom soup for cooking so you don't need to use the canned stuff. I hate using the canned stuff. (By the way I just ate the ranch chicken tonight that used the soup and it was so good. Never using cans again) 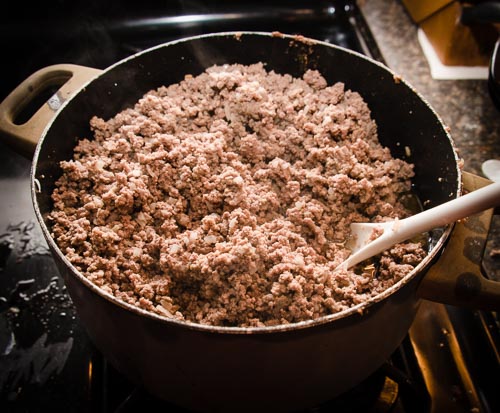 Trinity is still diligently peeling sweet potatoes while I brown and cool all the beef. 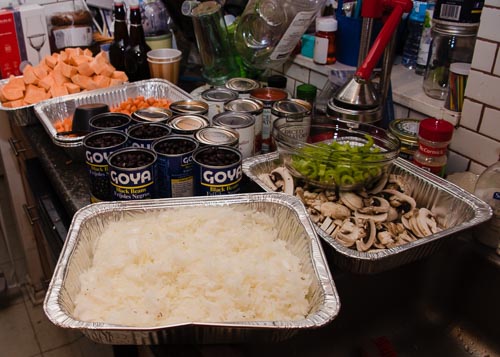 Veggie prep done! Cans all opened and ready to go! At this point the baby is done. She's been chillen on my back this whole time and she needs a nap. So I take a break to nurse her and try to get her down. 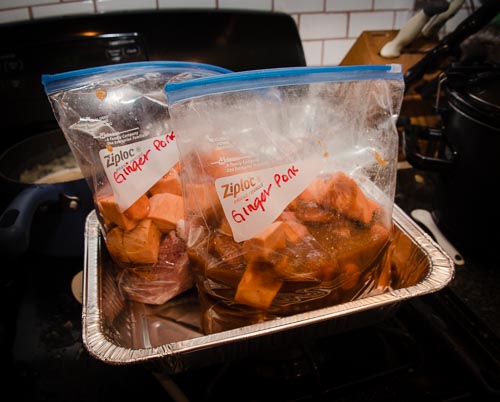 After an unsuccessful attempt at getting the baby down, I give her to DJ and try to finish. We have a New Year's Eve party to attend and time is running short! I go recipe by recipe and bag up each one. 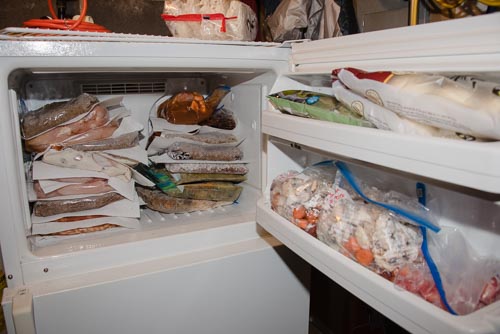 And done! I am wiped out! Look at all those dinners! You will notice that there are paper towels between each bag. You see last time a bunch of my bags stuck together. Imagine me trying to seperate giant bags of frozen stuff without ripping the bags or defrosting them. Really not fun. So the paper towels prevent that. Highly recommended. 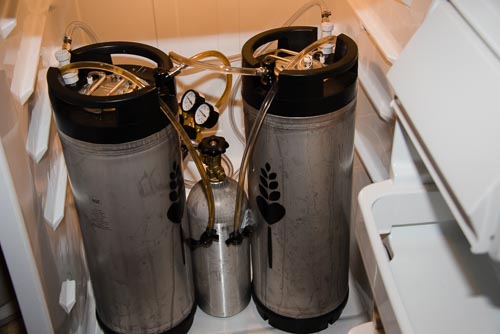 We have a "new to us" fridge in the utility room now. The fridge is DJs for his beer, the freezer is mine for my dinners. He really wanted me to show a pic of his kegs.. We currently have his Juice Box IPA on tap and a pear strawberry cider I made on tap. It pleases me. 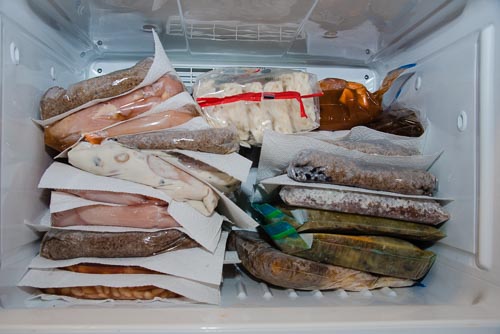 In total the prep took me approximately 4 hours. This was with Trinity helping with the peeling and chopping, but also included the baby break. I think those things balance each other out. I learned a few important things this time around. It's my third time doing this so I have figured out what works best for me. 1) I need to do this when everyone is home. It takes way less time when I have trinity to help and others to care for the baby. 2) Put paper towels between the bags in the freezer. Really happy about this one. It has made fishing the dinners out so much easier. We have eaten 3 of the dinners so far by the way and I think this is my favorite plan we have done. Delicious. 3) I need to wear good shoes. I don't usually wear shoes in the house but I am on my feet forever. That plus the baby on my back required some serious foot padding. 4) As I empty prep bowls and pans I put them immediately into the dishwasher (unless they are disposable, then just toss them) As you empty cans toss them in your recycling bag. By doing this it didn't look like my kitchen got destroyed by the time I was done. It just looked like I had cooked one dinner not twenty. When you are done with this you will be exhausted. No joke. But the benefits are so worth it. Come on! Try it! DJ has been wanting to brew beer himself for years. Last Saturday he knocked one thing off his bucket list when he went to Love 2 Brew http://www.love2brew.com/ and brewed a beer called Juice Box Rye IPA. Unfortunately, due to babies, I was not able to go. I really wanted to take pictures but it was a 3 -4 hour process and I did not relish the thought of wearing the baby for that length of time while trying to take pictures. Our friend Liz volunteered to join DJ and document the process while keeping him company. DJ likes having a buddy around when he does stuff and we haven't gotten to spend much time with Liz lately. So it was a perfect choice to have her go with him. DJ made 15 gallons of beer. Yes, 15 gallons. What does one do with 15 gallons of beer? I'm not sure but I will let you know! It will be ready in 3 weeks. I suppose we will drink it till its gone, however long that takes. A tough task, but we are up for the challenge. So with that introduction I will turn this post over to DJ! 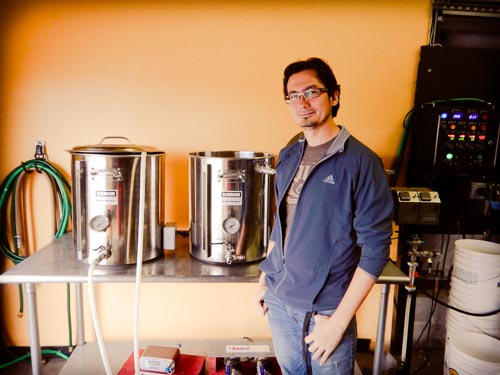 I am not Italian. Not even a little bit. Near as I can tell my ethnicity is German, Irish, Scottish, English... My family has been here for hundreds of years so I don't even know. I guess I could be considered Italian by association though. My step mom Vickie was super Italian. It took her three days to make spaghetti sauce. It would simmer on the stove and the anticipation would kill you. She would holler every few hours for someone to go and stir the sauce and it was torture knowing you had to keep waiting as you gazed at the pot of deliciousness. Once it was done I would revel in tender meatballs, sausage links, pasta and garlic bread. Unfortunately she guarded her recipes with a fierceness that made her 4 foot 11 inch body actually seem intimidating. I will never taste her sauce again, as she passed away years ago without teaching anyone how to make it to completion. This brings me to my point: I suck at making meatballs. I have tried and tried and they were just never right. I guess they were edible...But when you have had perfection, nothing else is ever quite as good. So I gave up. We would buy the giant bag of meatballs at Costco or BJ's and call it a day. Simmer in a jar of sauce and BOOM. Dinner. There was that part of me that hated buying the premade meatballs. I am a good cook, why cant I get that right? Why am I buying meatballs with dubious ingredients? My sister makes a bunch of meatballs and then freezes them so dangit.. I am going to do it! So here we go!! Recipe: 3lb ground beef (go big or go home right?) 3 eggs 3/4 cup milk 1 1/2 cup seasoned bread crumbs 1 1/2 teaspoon salt 3 teaspoon oregano 3 tablespoon fresh parsley 1 1/2 teaspoon garlic powder 1 1/2 teaspoon black pepper 1/4 cup parmesan cheese 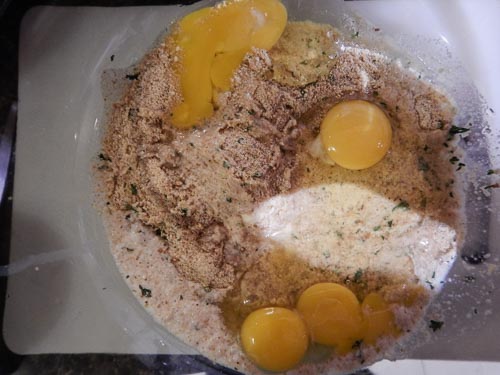 The kids and I visited my dad in Washington State last month. He runs a motorcycle campground called Cycle Camp. They have awesome stuff for the kids to play with such as a shaded dirt/sand pile, a swing set, and lots of room to roam. Caleb was in his glory and spent 90% of every day outside running amok. It was awesome. He spent a lot of time in that sand pit, it was his favorite thing. Look at this happy kid! 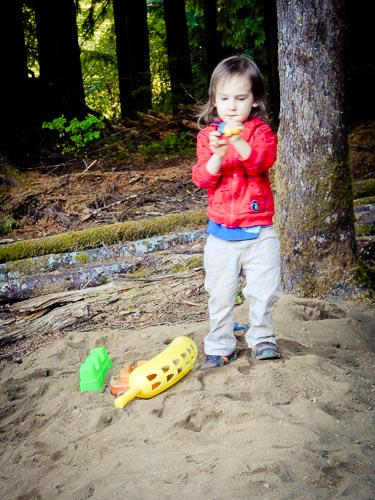 The other day I prepped 20 dinners, popped them into freezer bags, and froze them, saving myself a TON of time as well as money. I am not a genius, I am simply following the meal plans on this site http://www.5dollardinners.com/. They have weekly meal plans and 20-dinner bulk prep plans. The bulk prep ones are the ones I like. To buy a plan costs $5, but it gives you everything: shopping list, prep instructions, recipes, printer labels, and an instructional video. Super easy. This time around, I picked a crock pot meal plan, so every dinner is a slow cooker meal. 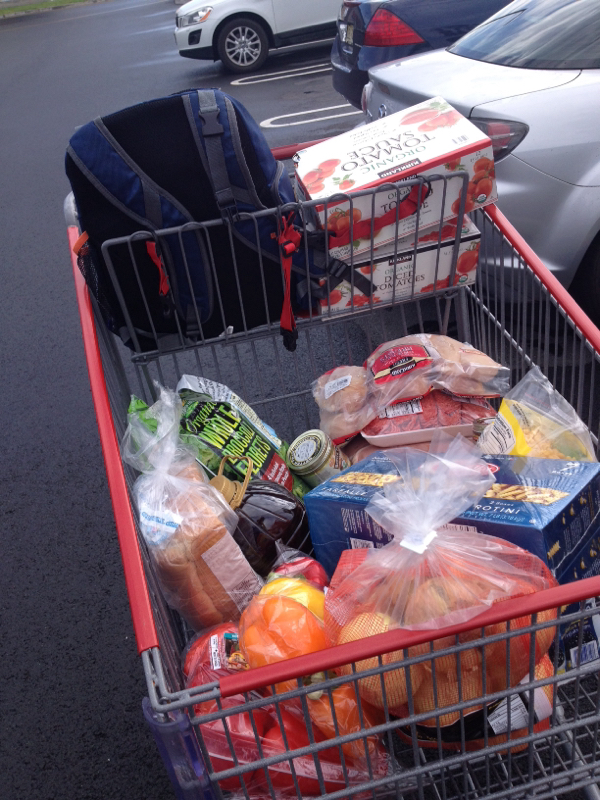 These are the ingredients for all 20 dinners bought at Costco. Not pictured are spices I already have at home and a few items I opted to get at the grocery store. (I seriously do not need 20 cans of chili peppers, so some items are better bought at the regular grocery store.) The shopping itself only took approximately a half hour. |
AuthorI'm so tired. The children are so not tired. |
 RSS Feed
